Table of Contents
ToggleInstalling a 4K home theater projector isn’t just about screen size, it’s about creating an immersive viewing experience that makes streaming services and movie nights feel like trips to the cinema. With 4K projectors now more affordable and easier to install than ever, homeowners can achieve theater-quality visuals without gutting a room or hiring an AV specialist. Whether you’re working with a dedicated media room or repurposing a living space, understanding lumens, throw ratios, and mounting basics will help you pick the right projector and get it running properly the first time.
Key Takeaways
- A 4K home theater projector delivers four times the pixel count of 1080p, providing sharper text, finer detail, and less visible pixelation on screens larger than 100 inches.
- Modern 4K projectors using laser or LED light sources last 20,000–30,000 hours compared to traditional bulbs rated for 3,000–5,000 hours, significantly reducing long-term maintenance costs.
- Match brightness to your room: light-controlled dedicated theaters need 1,500–2,000 lumens, while living rooms with ambient light require 2,500–3,500 lumens to maintain image clarity.
- Throw ratio determines projector placement—standard throw models work for larger rooms, short-throw models fit smaller spaces, and ultra-short-throw projectors sit inches from the wall for compact living areas.
- Entry-level 4K home theater projectors now start around $800–$1,200, making reference-quality home cinema accessible to DIYers without hiring professional installers.
- Proper ceiling mounting into joists with lag bolts, adequate ventilation clearance, and dedicated electrical circuits are essential for safe, long-term projector performance.
Why Upgrade to a 4K Home Theater Projector?
A 4K projector delivers 3840 × 2160 resolution, four times the pixel count of 1080p. That means sharper text, finer detail in dark scenes, and less visible pixelation on screens larger than 100 inches diagonal. For homeowners with walls or drop-down screens in the 100–150-inch range, 4K makes a noticeable difference compared to older HD models.
Beyond resolution, modern 4K projectors support HDR10 and sometimes Dolby Vision, which expand contrast and color range. Bright highlights pop without washing out, and shadows retain detail, critical for films shot with moody cinematography. These aren’t minor upgrades: they’re the difference between watching a movie and feeling like you’re in it.
Another practical advantage: lamp life and maintenance. Many 2026 models use laser or LED light sources rated for 20,000–30,000 hours, compared to traditional bulbs that burn out after 3,000–5,000 hours. That translates to years of use without replacements, cutting long-term costs and eliminating the hassle of hunting down proprietary bulbs.
Finally, pricing has come down. Entry-level 4K projectors now start around $800–$1,200, putting them within reach of DIYers who previously would’ve settled for 1080p or skipped projection altogether.
Key Features to Consider When Choosing Your 4K Projector
Not all 4K projectors suit every room. Here’s what to evaluate before buying.
Brightness and Contrast Ratio
Brightness is measured in ANSI lumens. For a dedicated, light-controlled theater room, 1,500–2,000 lumens works fine. If you’re projecting in a living room with ambient light, windows, recessed cans, table lamps, aim for 2,500–3,500 lumens to maintain image clarity without closing blackout curtains mid-afternoon.
Manufacturers sometimes inflate lumen specs, so cross-check third-party reviews that measure output with a light meter. Reputable testers like those at Tom’s Guide often publish real-world brightness data.
Contrast ratio defines the difference between the darkest black and brightest white a projector can produce. A ratio of 10,000:1 or higher helps dark scenes retain shadow detail instead of looking washed out. Dynamic contrast (where the projector dims the lamp on dark frames) can reach 1,000,000:1, but native contrast, the ratio without lamp dimming, is more reliable.
Projectors using DLP (Digital Light Processing) chips tend to offer higher native contrast than LCD models, though three-chip LCD projectors (often pricier) can match or exceed DLP in color accuracy.
Throw Distance and Room Size Compatibility
Throw ratio describes how far the projector must sit from the screen to produce a given image width. A standard throw projector (ratio 1.5:1 to 2.0:1) placed 12 feet from a wall produces roughly a 100–120-inch diagonal image. Short-throw models (0.5:1 to 1.0:1) can project 100 inches from just 4–6 feet away, ideal for smaller rooms or ceiling mounts close to the screen.
Ultra-short-throw (UST) projectors sit inches from the wall and bounce the image upward. They’re perfect for living rooms where furniture or foot traffic make mid-room placement impractical. UST models typically cost more and require precise leveling, any tilt causes keystone distortion.
Before buying, measure your room. If you’re ceiling-mounting, account for joist spacing (typically 16 inches on center) and use a lag bolt into a stud or a toggle bolt rated for at least 50 lbs if mounting between joists. Most projectors weigh 8–15 lbs, but the mount itself adds weight and leverage.
Keystone correction and lens shift help align the image without moving the projector, but they can degrade sharpness. Whenever possible, mount the projector square to the screen and use manual lens shift (physical adjustment) instead of digital keystone.
Top 4K Home Theater Projectors for Different Budgets
Here’s a breakdown by price tier, with practical notes on what each level delivers.
Budget: $800–$1,200
Entry-level 4K projectors like the BenQ TK700STi and Epson Home Cinema 2250 offer true 4K resolution, 2,000–3,000 lumens, and HDR10 support. Expect lamp-based light sources (3,000–5,000 hour lifespan) and basic contrast ratios around 10,000:1. These work well in dedicated rooms with controlled lighting. Setup is straightforward, tripod or ceiling mount, HDMI from a streaming device or receiver, and manual focus.
Mid-Range: $1,500–$2,500
This tier brings laser or hybrid LED/laser light sources, higher brightness (3,000–4,000 lumens), and better color gamut coverage. Models like the Optoma UHD55 and ViewSonic PX701-4K handle ambient light better and include motorized lens shift or zoom, making installation more forgiving. Many support eARC (enhanced Audio Return Channel) for passing Dolby Atmos soundtracks back to a receiver, useful if you’re integrating a projector into an existing home theater setup.
Premium: $3,000–$5,000+
High-end projectors like the Sony VPL-VW325ES (SXRD chip) and Epson Pro Cinema LS12000 (3LCD laser) deliver near-reference image quality with 100% DCI-P3 color coverage, native contrast above 100,000:1, and lens memory for multiple aspect ratios. Installation often involves custom screen materials (acoustically transparent for in-wall speakers, or ALR, ambient light rejecting, for bright rooms) and professional calibration using a colorimeter. These projectors justify the cost if you’re serious about color accuracy and long-term reliability.
For those prioritizing smart home integration, newer models include Wi-Fi, voice control compatibility, and built-in streaming apps, reducing cable runs and simplifying setup.
Setting Up Your 4K Projector: Installation Tips for Homeowners
1. Choose Your Screen or Wall Surface
A dedicated projector screen (fixed-frame or motorized) will always outperform a bare wall. Screen materials are engineered for even light reflection and color neutrality. If budget is tight, use a smooth, matte white wall, avoid eggshell or satin paint finishes, which create hotspots. Screen gain (reflectivity) typically ranges from 1.0 (neutral) to 1.5 (brighter, narrower viewing angle). For most home theaters, a 1.0–1.1 gain screen in a 16:9 aspect ratio works best.
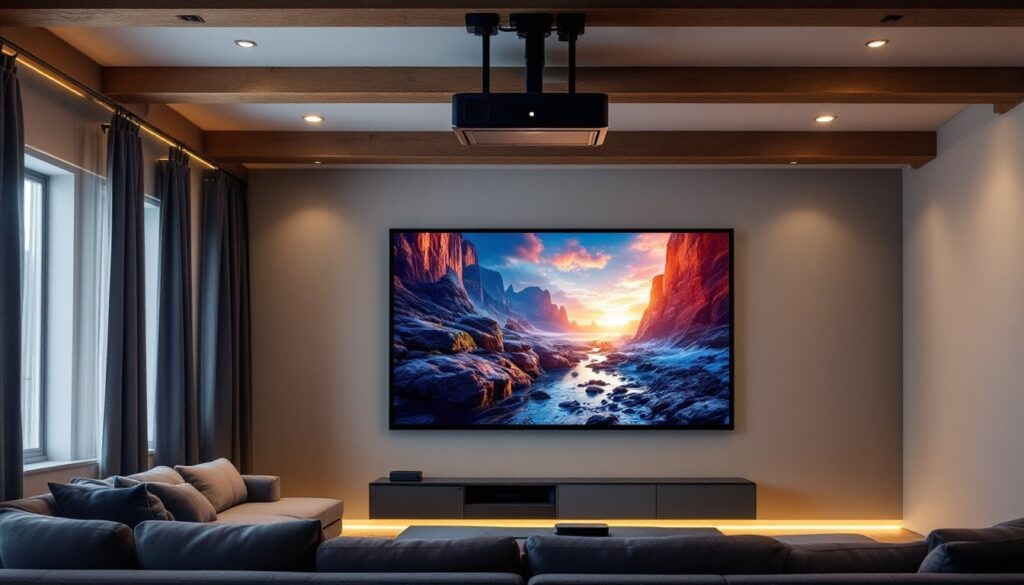
2. Mount the Projector Securely
Ceiling mounts offer the cleanest look and keep the projector out of the way. Locate a ceiling joist with a stud finder, mark the mount’s bolt holes, and pre-drill pilot holes for 3-inch lag bolts. If mounting between joists, use a ceiling brace bar (similar to a ceiling fan box) rated for the projector’s weight plus mount.
Run HDMI cables through the wall or ceiling using in-wall rated CL3 or CL2 cable to meet fire code. Standard HDMI cables aren’t rated for in-wall use. For runs over 25 feet, consider an active HDMI cable or a fiber-optic HDMI cable to prevent signal degradation.
3. Power and Ventilation
Projectors generate heat. Leave at least 6 inches of clearance around intake and exhaust vents. If ceiling-mounting, avoid placing the projector directly above an HVAC vent, which can blow dust into the optics or interfere with internal cooling fans.
Install a dedicated 15-amp circuit if you’re running a projector, receiver, subwoofer, and other gear simultaneously. Home theaters can draw 8–12 amps under load, and sharing a circuit with lighting or kitchen appliances risks tripping breakers mid-movie.
4. Calibration Basics
Out of the box, most projectors default to a “vivid” or “dynamic” picture mode optimized for showroom brightness, not accuracy. Switch to Cinema or Movie mode, then adjust brightness (black level) and contrast (white level) using test patterns. Free calibration discs or apps like the Spears & Munsil UHD Benchmark walk you through the process.
If the room has variable lighting, save multiple picture presets: one for daytime viewing with higher brightness, another for night with lower lamp output and deeper blacks.
5. Safety and Permits
Most projector installations don’t require permits, but running new electrical circuits or opening walls for cable routing might, depending on local codes. If you’re unsure about electrical work, hire a licensed electrician, improper wiring is a fire hazard.
Wear safety glasses when drilling overhead, and use a dust mask if cutting into older drywall (pre-1980s homes may contain asbestos in joint compound). For projectors weighing over 20 lbs or UST models mounted on custom furniture, consider enlisting a second pair of hands for positioning and leveling.
For more hands-on installation guidance, resources from Popular Mechanics offer detailed tool recommendations and step-by-step project walkthroughs that complement manufacturer manuals.
Conclusion
A 4K home theater projector turns any room into a cinematic space, provided you match lumens to lighting, throw distance to room size, and mount it securely. The upfront effort, measuring, mounting, calibrating, pays off in years of immersive viewing without the recurring cost of theater tickets or streaming rental fees.